

Google Analytics – A Guide for Successful Business [2023]
![Google Analytics – A Guide for Successful Business [2023]](/images/blog/google-analitika/cover.jpg)
Table of Contents
Google Analytics – every company’s fear and trembling? Don’t be afraid. Google Analytics is known for its mystique and complexity, but in reality it is an extremely useful tool that anyone can master.
In 2023, a major challenge awaits us: the transition from GA3 (Universal Analytics) to GA4. This means we need to understand what is changing and how to adapt.
In this guide, we will cover:
- What Google Analytics is and why you need it
- The difference between GA3 (Universal Analytics) and GA4
- How to set up Google Analytics step by step
- Reports and how to use them for better business decisions
What Is Google Analytics?
Google Analytics is a free analytical tool offered by Google. It enables detailed tracking of activity on your website or online store.
With Google Analytics, you can:
- Track visitor behavior – how they navigate your site, which pages they visit, and how much time they spend on each page.
- Track conversions – whether it’s purchases, completed forms, or newsletter sign-ups.
- Identify drop-off points – where visitors leave your site and where they get stuck.
- Analyze purchases – which products they buy, what the average order value is, and how many customers return.
- Understand your traffic – where visitors come from, which devices they use, and what their interests are.
Google Analytics is an indispensable tool for anyone involved in online marketing. Without it, you would be operating blindly – with no data on what works and what doesn’t.
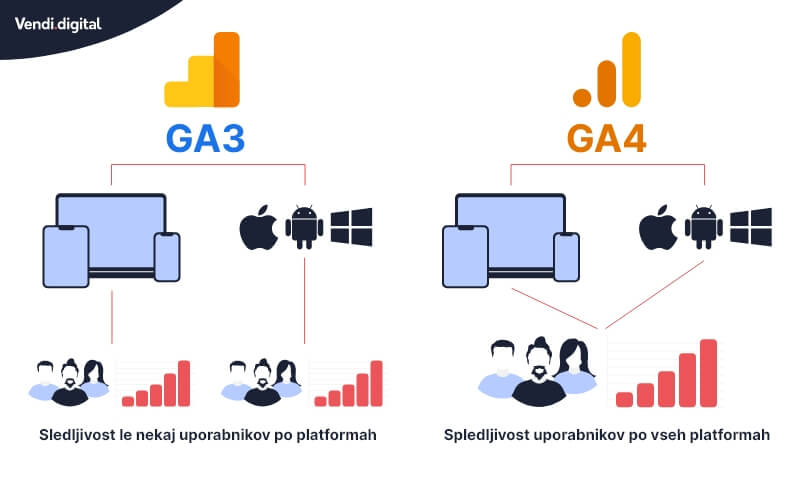
The Difference Between GA3 and GA4
Before we dive into the settings, it’s important to understand that there are two versions of Google Analytics:
- GA3 (Universal Analytics) – the current or older version used by users who registered before October 2020.
- GA4 – the newest version of Google Analytics, which will fully replace Universal Analytics in the future.
What Is GA4?
GA4 is the latest generation of Google Analytics. It brings a completely redesigned interface, a different approach to data collection, and improved functionality in the areas of artificial intelligence and machine learning.
Key differences of GA4 compared to Universal Analytics:
- Event-based tracking – GA4 is based on events, while GA3 was based on sessions.
- Unified measurement – GA4 combines data from websites and mobile apps in a single view.
- Improved privacy – GA4 is designed with a cookieless future in mind.
- Advanced machine learning models – automatically detects trends and anomalies in data.
How Do I Know If I Have GA4?
Checking is simple and requires just two steps:
- Sign in to Google Analytics – go to analytics.google.com and sign in with your Google account.
- Check the property ID – if your property ID starts with “UA-” (e.g., UA-123456789), you are using Universal Analytics (GA3). If it starts with “G-” (e.g., G-ABC123DEF4), you are using GA4.
If you are still using Universal Analytics, now is the right time to transition to GA4, as Google will be gradually phasing out Universal Analytics.
How Do I Set Up Google Analytics?
Many people open Google Analytics and immediately feel lost. Don’t worry – in this section, we will walk you through the entire setup process, step by step.
1. Google Analytics Sign-In – Create a User Account
To use Google Analytics, you need a Google or Gmail account. If you don’t have one yet, you can create one for free at accounts.google.com.
Once you have a Google account, follow these steps:
- Go to analytics.google.com and sign in with your Google account.
- Click on the Admin tab (the gear icon in the bottom left corner).
- Click on Create Account.
- Click the Start measuring button.
- Name your account – use your company name or website name (e.g., “My Company Ltd.”).
- For the platform type, select Web.
- Enter your website URL – e.g., “www.your-site.com”.
- Select your business category.
- Set the country and time zone.
- Accept the terms of service and click Create.
After these steps, your Google Analytics account will be created and ready for the next phase.
2. Set Up a Data Stream
In Universal Analytics (GA3), this feature was called “Views”, while in GA4 it is called “Data Stream”.
A Data Stream determines where Google Analytics collects data from. Setting it up is straightforward:
For GA4:
- In the Admin section, go to Data Streams.
- Click Add stream and select Web.
- Enter your website URL.
- Name your data stream (e.g., your website name).
- Click Create stream.
For Universal Analytics (GA3):
- In the Admin section, go to Views under the property column.
- Click Create View.
- Select Website and enter a view name.
- Set the time zone and click Create View.
After this step, you have configured where Google Analytics will collect data from. Now it’s time for the final step – installing the tracking code.
3. Add the Tracking Code
The last step! The tracking code is what connects Google Analytics to your website. Without it, Google Analytics cannot collect any data.
The good news: you don’t need any programming knowledge. Google provides you with ready-made code that you simply need to insert into your website.
WordPress is the most common CMS that website owners combine with Google Analytics. If you want to learn more about CMS platforms, read our guide to CMS systems.
Most CMS platforms allow you to insert code directly into the header of your website, which is all you need.
Where Do I Find the GA Tracking Code?
You can find your tracking code in Google Analytics as follows:
- Sign in to Google Analytics.
- Go to the Admin section.
- For GA4: click on Data Streams, select your stream, and look for the Tagging Instructions or Global Site Tag (gtag.js) section.
- For Universal Analytics: go to Tracking Info > Tracking Code.
- Copy the entire code that is displayed.
The code will look approximately like this (for GA4):
<!-- Google tag (gtag.js) -->
<script async
  src="https://www.googletagmanager.com/gtag/js?id=G-XXXXXXXXXX">
</script>
<script>
  window.dataLayer = window.dataLayer || [];
  function gtag(){dataLayer.push(arguments);}
  gtag('js', new Date());
  gtag('config', 'G-XXXXXXXXXX');
</script>
How and Where Do I Insert the GA Tracking Code?
You need to insert the tracking code into the <head> section of every page on your website. The most common methods:
- Directly in the CMS – most platforms (WordPress, Shopify, Wix) have a dedicated field for inserting code into the header.
- Using a plugin – for WordPress, there are plugins such as “Insert Headers and Footers” or official Google plugins.
- Via Google Tag Manager – for more advanced users.
If you need help setting up Google Analytics or Google Tag Manager, contact us – we’ll be happy to help.
Google Analytics and Reports
Google Analytics is an extremely comprehensive tool with countless options for reporting and data export. Reports are divided into five main categories, each offering a unique insight into how your website is performing.

1. Real-Time Reports
Real-time reports allow you to monitor activity on your website live, at this very moment. This includes:
- How many users are currently on your site
- Which pages they are currently viewing
- Where they are coming from (geographic location)
- Which channels brought them to your site
- Which events they are triggering in real time
These reports are especially useful when you want to verify that the tracking code is working correctly, or when you are monitoring the impact of ongoing campaigns.
2. Audience Reports
Audience reports answer the question: who are your users? Here you will find detailed information about:
- Demographics – the age and gender of your visitors
- Devices – whether they use a desktop computer, mobile phone, or tablet
- Interests – which content categories interest them
- Geography – which countries, regions, and cities they come from
- Behavioral patterns – new vs. returning visitors, visit frequency
- Technology – which browsers and operating systems they use
3. Acquisition Reports
Acquisition reports reveal where your traffic comes from. The main traffic sources:
- Organic Search – through the Google search engine
- Direct – URL entered directly into the browser
- Referral – through a link on another website
- Email – through an email message
- Social – from Facebook, Instagram, LinkedIn
- Paid Search – through Google Ads
- Affiliate – from partner links
- Other – unclassified traffic
4. Behavior Reports
Behavior reports focus on the performance of your content:
- Which pages are most visited
- How much time visitors spend on each page
- What the bounce rate is
- Which is the landing page
- Which is the exit page
- How quickly pages load (Site Speed)
5. Conversion Reports
Conversion reports are the most important for your business. Conversions you can track:
- Purchases – for online stores
- Completed forms – contact forms, newsletter sign-ups
- Social media shares
- Achieved goals – any custom goals
- Revenue – total revenue through the website
With properly configured conversions, you can precisely calculate the return on investment (ROI) for each marketing channel.
Conclusion – Google Analytics Course
After reading this guide, you are certainly more knowledgeable about what Google Analytics is, how it works, and why it is so important for your business.
Now you know:
- What Google Analytics is and what it is used for
- What the difference is between GA3 and GA4
- How to set up tracking step by step
- Which types of reports are available to you
You can now set up tracking on your own – follow the steps in this guide and in just a few minutes you will have a working Google Analytics on your website.
For even better results, we recommend reaching out to SEO specialists. Visit our page on SEO optimization or contact us for a free consultation.

Marko Štrbac
Director
Marko Štrbac leads Vendi Digital d.o.o. and has over 18 years of experience in website and online store optimization and development.
LET'S START TOGETHER
Contact us
Already know what you want? Great. Have questions? Even better.
Start a project